
 English
 Italy
Italy
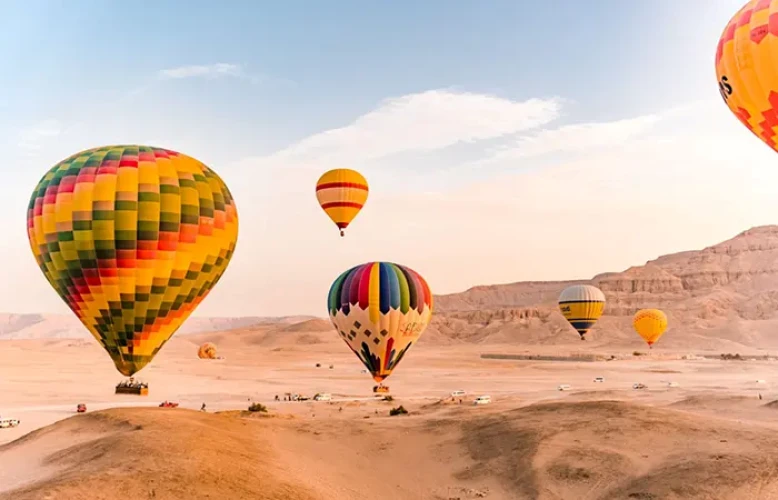
Photography Guide: How to Capture Stunning Shots from a Hot Air Balloon
Photography Guide: How to Capture Stunning Shots from a Hot Air Balloon
Floating 2,000 feet above the temples and bright green fields of Luxor feels like a dream, for any photography lover. With the golden morning light hitting the Nile River and the rugged desert mountains of the West Bank every direction a hot air balloon sees offers a postcard-shot view.
Taking photos from a moving hot air balloon basket presents a challenge. A hot air balloon basket must deal with changing morning light, reflections, motion and tight spaces.
This comprehensive guide will walk the air balloon through everything a hot air balloon needs to know to capture looking photos during a hot air balloon’s Luxor flight.
1. Essential Camera Gear: What to Bring (and What to Leave Behind)
When you get into a wicker basket before the sun comes up make sure your equipment is light and easy to use. You don't want to have to handle camera bags or switch lenses while standing next to other people.
Your smartphone is more than enough. Modern smartphones like iPhones and Samsung Galaxies have built-in stabilization, HDR settings and multiple lenses including -wide, main and telephoto. They are light, easy to hold with one hand. Can take high-quality pictures.
If you bring a DSLR or mirrorless camera use a zoom lens like 24-70mm or 18-135mm. This lets you take shots of the desert meeting the Nile and also get closer pictures of specific landmarks below without having to change lenses in the dusty wind.
Important things to have are a wrist strap or neck lanyard for your phone or camera. Losing your phone over the side of a balloon basket is a problem. Bring a charged battery because the cold morning desert air can drain batteries faster, than normal.
2. Mastering the Morning Light: Timing is Everything
Lighting changes a lot during a flight that lasts between 45 and 60 minutes. Understanding how to use the light can determine if your photos turn out well or not.
The Blue Hour (Before Takeoff): Just before the sun comes up the sky has an cool blue color. This is the time to take pictures of the bright flames from the burners inside your balloon and the other balloons on the launch area.
The Golden Hour (First 15 Minutes): soon as you start flying the sun gives out warm and golden light over the land. The desert sand the limestone cliffs and the old buildings will look very colorful, with orange colors. Take photos facing the light or going across it to get shadows and more depth.
High Contrast Later in the Flight: When the sun gets higher the light becomes very strong. Makes deep shadows. Use the HDR (High Dynamic Range) setting on your camera to make the bright sky and the darker parts of the ground look better together.
3. Top Composition Tips for Aerial Photography
Taking a photo from the sky feels very different from taking a photo, on the ground. Here is how to make photo shots stand out:
Look Down for Patterns
Do not stare at the horizon. Look down below the basket. The geometric patterns of farming fields, narrow irrigation canals, palm groves and tiny figures of farmers or animals form top‑down compositions.
Use Foreground Elements for Scale
Add a sliver of the balloon’s wicker basket edge or colorful nylon fabric, in the corner of the photo frame. This gives the viewer a sense of depth and scale. The photo reminds the viewer that the photo is taken high up in the sky.
Capture the Contrast
Luxor’s geography offers a treat. The sharp line where the green Nile valley abruptly ends and turns into the barren golden desert is striking. The photo frames both elements side by side. The photo captures the contrast.
4. Camera Settings and Technical Tips
If you are shooting with a camera like a DSLR or mirrorless keep these settings in mind to avoid blurry photos.
Keep Shutter Speeds Fast: Even though balloons float smoothly they are still moving with the wind. You are standing in a slightly swaying basket. Set your shutter speed to least 1/500 sec or faster to freeze any motion blur.
Aperture and ISO: Keep your aperture around f/4 to f/8 for sharp landscape details. If its still dim during takeoff bump up your ISO slightly of letting your shutter speed drop too low.
Turn Off the Flash: Never use a camera flash inside an air balloon. Your flash will only bounce off the basket edges or air particles. Ruin your photo by creating bright glare, against the windows or lens.
5. Etiquette in the Basket
Remember that you are sharing your basket with travelers who also want to enjoy the view and take photos.
Don’t hog the corners: the corner spots give you the most unobstructed field of view. Take your shots then politely step aside to let others peek over the edge.
Hold your gear securely: be mindful of your elbows and camera straps when leaning over the safety rail. Never lean out far—keep your center of gravity safely inside the basket.
Final Checklist Before You Fly
Check that your phone or camera battery is fully charged the night
Make sure your phone storage is empty so you have space for 4K video clips and burst photos.
Put a safety lanyard or wrist strap on your device.
Wipe your camera lens or phone glass to remove any smudges before you go out.
Step into the basket with your gear secured keep your eyes open, for landscapes and get ready to capture some of the most memorable travel photos of your life!





-webp.webp "Hilton")
-webp.webp "dusit")
-webp.webp "Marriott Hotels")
-webp.webp "Azimut Hotel")
-webp.webp "Golden Tulip")
-webp.webp "sheraton")
-webp.webp "westin hotel")
-webp.webp "Movenpick")